iPhone camera settings for photography
With the advent of smartphones, anyone can now capture stunning photographs on the go. The iPhone, in particular, has revolutionized mobile photography with its advanced camera features. However, to truly unleash the potential of your iPhone's camera, it is essential to understand and utilize the various camera settings available. In this comprehensive guide, we will delve into the intricacies of iPhone camera settings, enabling you to take your photography skills to new heights.
Understanding Exposure and Focus
Exposure and focus are two crucial aspects of photography that can make or break an image. With the iPhone's camera settings, you have control over these elements, allowing you to capture perfectly exposed and focused photos in any lighting condition.
Controlling Exposure
The exposure of a photo refers to the amount of light that reaches the camera's sensor. The iPhone offers two ways to control exposure: the Auto Exposure (AE) and the Manual Exposure (ME). In Auto Exposure mode, the camera determines the optimal exposure based on the scene's lighting conditions. However, in certain situations, the camera's automatic settings may not accurately capture the desired exposure. This is where Manual Exposure mode comes in handy.
To manually adjust exposure on your iPhone, tap on the screen to set focus, and then swipe up or down to adjust the exposure level. By increasing the exposure, you can brighten up a dark scene, while decreasing it will darken an overly bright scene. This level of control allows you to capture well-exposed images, even in challenging lighting conditions.
Mastering Focus
Focus is another crucial element in photography that determines the sharpness of your subject. The iPhone offers multiple focus options to ensure that your subject is crisp and clear.
The default focus mode on the iPhone is Auto Focus (AF), where the camera automatically determines the focus point based on the scene. However, for more precise control, you can switch to Manual Focus (MF) mode. To activate Manual Focus, tap on the screen and hold until the yellow box appears, indicating that the focus is locked. You can then adjust the focus manually by sliding your finger up or down.
Additionally, the iPhone also offers a feature called Focus Peaking. This feature highlights the areas of the image that are in focus, making it easier to ensure sharpness. To enable Focus Peaking, go to Settings > Camera > Focus Peaking, and toggle it on. This tool is especially useful in situations where precision is crucial, such as macro photography or capturing intricate details.
Utilizing HDR Mode for High-Contrast Scenes
High-contrast scenes, where there are both bright and dark areas, can pose a challenge for any camera. However, the iPhone's HDR (High Dynamic Range) mode can help you capture stunning details in such situations.
Understanding HDR
HDR works by capturing multiple images at different exposures and then combining them to create a single photo with a wide dynamic range. This technique allows you to capture details in both the highlights and shadows, resulting in a more balanced and visually appealing image.
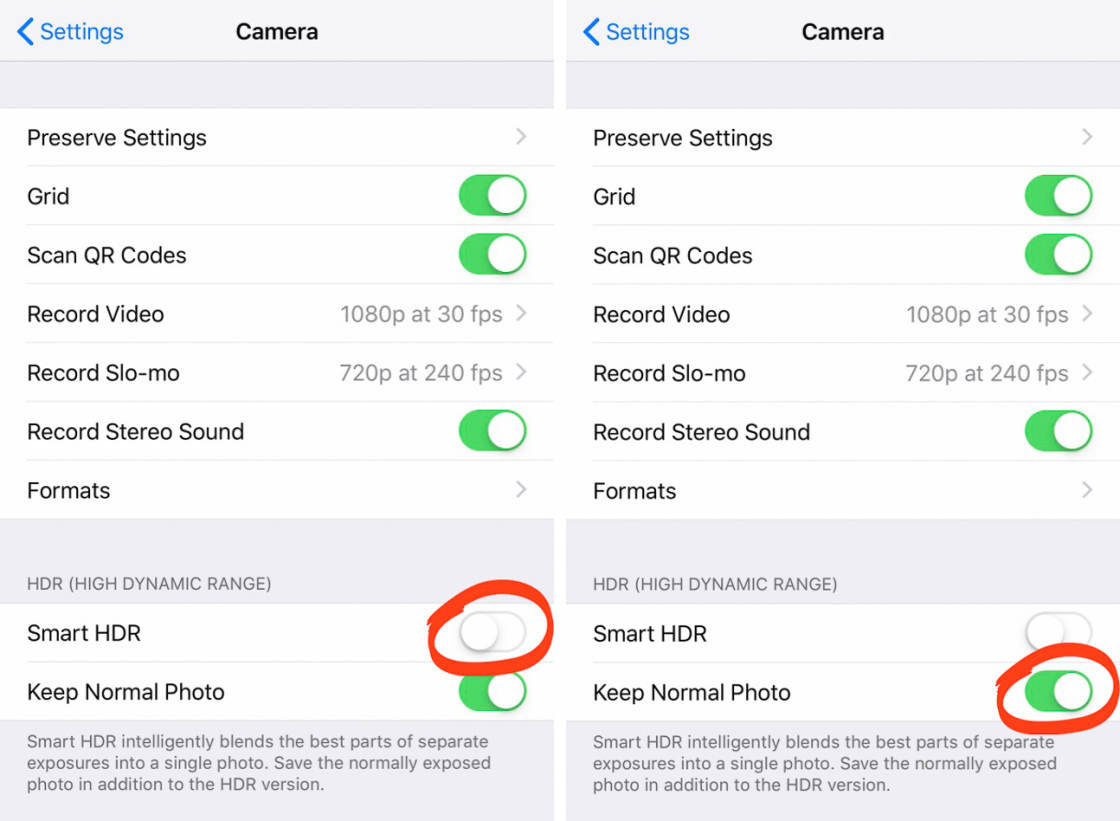
To enable HDR mode on your iPhone, open the Camera app and tap on the HDR icon at the top of the screen. By default, the iPhone's HDR mode is set to Auto, which means it will automatically activate when the scene requires it. However, you can also choose to manually enable or disable HDR mode by tapping on the icon.
Using HDR Effectively
While HDR can produce stunning results, it is important to use it judiciously. In some situations, such as when photographing moving subjects or in very bright conditions, HDR may not be ideal. Therefore, it is essential to understand when to use HDR and when to rely on other camera settings.
When shooting high-contrast scenes, such as landscapes with a bright sky and dark foreground, HDR mode can help retain details in both areas. However, be mindful of potential motion blur if there are moving elements in the frame. In such cases, it may be better to use other exposure and focus techniques to ensure a sharp image.
Experimentation is key when using HDR mode. Try capturing the same scene with and without HDR to see the difference in the final result. This will help you understand the capabilities of HDR and allow you to make informed decisions when shooting high-contrast scenes.
Mastering Portrait Mode for Professional-Looking Portraits
Portrait mode on the iPhone is a powerful tool for creating stunning portraits with a beautifully blurred background, also known as the bokeh effect. This feature simulates the shallow depth of field typically achieved with professional cameras and lenses.
Understanding Depth Effect
The depth effect in Portrait mode is achieved by using the dual-camera system on the iPhone. The primary camera captures the subject, while the telephoto lens analyzes the depth information to create a depth map. This depth map is then used to blur the background, creating a pleasing separation between the subject and the surroundings.
To use Portrait mode, open the Camera app and swipe to the Portrait mode option. Ensure that your subject is within the recommended distance for optimal results. The iPhone will provide on-screen prompts to guide you through the process.
Optimizing Portrait Mode
While Portrait mode can produce stunning results, it is important to consider certain factors to optimize the outcome.
Firstly, lighting plays a crucial role in portrait photography. Soft, diffused lighting is ideal for achieving a flattering look. Avoid harsh direct sunlight or strong artificial lighting, as they can create unflattering shadows and highlights. Consider using natural light or diffused artificial light sources to create a pleasing and even illumination on your subject.
Secondly, pay attention to the distance between your subject and the background. The further the subject is from the background, the more pronounced the bokeh effect will be. Experiment with different distances to achieve the desired level of background blur.
Lastly, be mindful of the depth map generated by the iPhone. Sometimes, complex subjects with intricate details, such as wispy hair or transparent objects, can pose a challenge for the depth sensing technology. In such cases, the iPhone may struggle to create an accurate depth map, resulting in less effective background blur. It is important to be aware of these limitations and adjust your composition accordingly.
Exploring the Power of Night Mode
Low-light photography has always been a challenge for smartphone cameras. However, with the introduction of Night mode on the iPhone, capturing stunning photos in low-light conditions has become easier than ever before.
Understanding Night Mode
Night mode utilizes advanced algorithms and long exposure techniques to capture more light in low-light situations. When enabled, the iPhone will automatically detect low-light conditions and activate Night mode, extending the exposure time to capture more details and reduce noise.
To enable Night mode, open the Camera app and look for the Night mode icon, which resembles a moon. When Night mode is active, the iPhone will display the recommended exposure time on the screen. You can also adjust the exposure time manually by sliding your finger up or down.
Capturing Great Night Photos
While Night mode can significantly improve your low-light photos, there are a few tips and tricks to keep in mind to capture the best possible images.
Firstly, stabilize your iPhone to minimize camera shake. In low-light conditions, even the slightest movement can result in blurry photos. Use a tripod or find a stable surface to rest your iPhone on. Alternatively, you can also use the timer function to reduce the chances of camera shake caused by pressing the shutter button.
Secondly, experiment with different exposure times to find the optimal balance between capturing enough light and avoiding overexposure. Adjust the exposure time based on the available light and the desired level of detail in your scene.
Lastly, be patient and avoid rushing the shot. Night mode requires a longer exposure time, so it is important to hold your iPhone steady until the exposure is complete. This may take a few seconds, depending on the lighting conditions. Patience and stability are key to capturing sharp and well-exposed night photos.
Harnessing the Potential of Burst Mode
When it comes to capturing fast-moving subjects or critical moments, Burst mode on the iPhone can be a game-changer. Burst mode allows you to capture a series of photos in rapid succession, increasing the chances of getting the perfect shot.
Activating Burst Mode
To activate Burst mode, open the Camera app and press and hold the shutter button. The iPhone will start capturing a continuous stream of photos until you release the button.
Selecting the Best Shot
Once you've captured a series of photos in Burst mode, it's time to select the best shot from the sequence. To do this, open the Photos app and find the burst sequence. Tap on the thumbnail to view all the photos in the burst. Here, you can swipe through the images and select the ones you want to keep.
To choose the best shot manually, tap on "Select..." at the bottom of the screen. You can then swipe through the burst sequence and tap on the photos you want to keep. Once you've made your selection, tap on "Done" to save the chosen photos and discard the rest.
When to Use Burst Mode
When to Use Burst Mode
Burst mode is particularly useful in situations where the subject is in motion or where timing is crucial. Here are a few scenarios where Burst mode can come in handy:
Sports and Action Photography: When capturing fast-paced sports or action moments, such as a soccer player kicking a ball or a bird taking flight, Burst mode allows you to capture multiple frames and increase the chances of getting the perfect shot with sharp focus and dynamic movement.
Children and Pets: Children and pets are notorious for their unpredictable movements. Burst mode helps you capture those fleeting moments of joy, laughter, or playfulness, ensuring that you don't miss a single precious moment.
Event Photography: Burst mode is also valuable when photographing events, such as concerts or performances, where there is a lot of movement and action. It allows you to capture the energy and excitement of the moment, ensuring that you have a variety of shots to choose from.
Macro Photography: When photographing tiny subjects, such as insects or flowers, Burst mode helps you capture the subtle details and intricate textures. It allows you to choose the frame with the best focus and composition, ensuring a stunning macro shot.
Remember, Burst mode captures a series of photos in quick succession, so be mindful of the storage space on your iPhone. Delete unnecessary bursts to free up storage and keep your device running smoothly.
Enhancing Your Photos with Live Photos
Live Photos is a unique feature on the iPhone that adds movement and life to your images. It captures a few seconds of video and audio before and after you take a photo, turning a still image into a mini-movie.
Enabling Live Photos
To enable Live Photos, open the Camera app and look for the concentric circles icon at the top of the screen. If it is yellow, Live Photos is active. If it is white, tap on it to enable Live Photos.
Viewing and Editing Live Photos
Once you've captured a Live Photo, you can view it by opening the Photos app and selecting the Live Photo. To play the motion, press firmly on the screen (3D Touch) or press and hold (non-3D Touch devices). You can also swipe up on the Live Photo to reveal additional options, such as Loop, Bounce, or Long Exposure.
Editing Live Photos allows you to fine-tune the motion, choose a different frame as the key photo, or apply various effects. To edit a Live Photo, open it in the Photos app, tap on "Edit," and make the desired adjustments. Once you're satisfied with the changes, tap on "Done" to save the edited Live Photo.
Sharing Live Photos
When sharing Live Photos with others, keep in mind that not all platforms support the Live Photo format. To share a Live Photo, you can use the Share Sheet on your iPhone and select a compatible platform, such as iMessage or AirDrop. Alternatively, you can convert Live Photos to shareable formats, such as GIFs or videos, using third-party apps or online converters.
Live Photos are a fun way to add an extra dimension to your images, capturing the essence of a moment beyond a static frame. Experiment with Live Photos and explore the creative possibilities they offer.
Unleashing the Power of ProRAW
ProRAW is a feature available on select iPhone models that allows you to capture images in a format that retains all the raw data from the camera sensor. This gives you greater control over the editing process and enables you to capture more details and nuances in your photos.
Enabling ProRAW
To enable ProRAW mode, open the Camera app and tap on the ProRAW icon at the top of the screen. When ProRAW is active, the icon will turn yellow. It is important to note that ProRAW is only available on specific iPhone models and may require the latest iOS updates.
Editing ProRAW Images
ProRAW images are captured in a format that preserves all the data from the camera sensor, providing you with more flexibility during the editing process. To edit a ProRAW image, open it in the Photos app and tap on "Edit." Here, you can adjust various aspects of the photo, such as exposure, white balance, contrast, and more, without sacrificing image quality.
Editing ProRAW images requires a photo editing app that supports the format. The built-in editing tools in the Photos app provide basic adjustments, but for more advanced editing capabilities, consider using third-party apps like Adobe Lightroom or Snapseed.
Benefits of ProRAW
The key benefit of ProRAW is the ability to capture and preserve more details and dynamic range in your photos. Unlike JPEG or HEIC formats, ProRAW retains the full range of color and tonal information captured by the camera sensor. This allows for more precise adjustments and greater control over the final image.
ProRAW is particularly useful in challenging lighting conditions, high-contrast scenes, or when you want to push the boundaries of post-processing. It gives you the flexibility to fine-tune exposure, recover highlights and shadows, and make nuanced adjustments to color and tone.
Making the Most of Panorama Mode
Panorama mode on the iPhone allows you to capture wide-angle views and stunning landscapes by seamlessly stitching together multiple photos into a single panoramic image.
Capturing a Panorama
To capture a panorama, open the Camera app and swipe to the Pano mode. Tap on the shutter button to start the capture process. Follow the on-screen instructions, and slowly pan your iPhone across the scene, keeping the arrow aligned with the guiding line. Once you reach the end point or when the arrow disappears, the panorama will automatically be saved.
Tips for Panorama Photography
While capturing a panorama is relatively straightforward, there are a few tips that can help you create more impressive panoramic images:
Steady Movement: Keep your iPhone steady and move it smoothly across the scene. Avoid jerky movements or sudden changes in direction, as they can result in stitching errors or distortions in the final image.
Vertical Panoramas: Panorama mode is not limited to capturing horizontal landscapes. You can also experiment with vertical panoramas, especially when photographing tall buildings or expansive cityscapes.
Foreground Interest: Including a prominent foreground element in your panorama adds depth and visual interest to the image. Look for leading lines, interesting textures, or colorful objects to include in the foreground.
Lighting Conditions: Panoramas can be challenging in situations with extreme variations in lighting. Consider shooting during the golden hour or when the lighting is more even to ensure a balanced exposure throughout the panorama.
Experiment with different scenes, angles, and compositions to create unique and captivating panoramic images. Be patient during the capture process and take your time to ensure a seamless result.
Understanding and Utilizing Gridlines and Composition Techniques
Composition plays a crucial role in creating visually pleasing and well-balanced photographs. The iPhone offers gridlines and various composition techniques to help you improve your framing and create compelling images.
Activating Gridlines
To enable gridlines on your iPhone, go to Settings > Camera > Grid, and toggle it on. Gridlines divide the frame into thirds both vertically and horizontally, creating nine equal sections. The intersection points of these lines, known as the "rule of thirds," can guide you in placing your subject and other elements in the frame.
Rule of Thirds
The rule of thirds suggests that placing key elements along the gridlines or at the intersection points creates a more visually pleasing composition. Instead of centering your subject, consider positioning it off-center to create a sense of balance and visual interest.
For example, when photographing a landscape, align the horizon along one of the horizontal gridlines rather than in the center of the frame. If capturing a portrait, position the subject's eyes along the top horizontal gridline or at one of the intersection points.
Leading Lines
Leading lines are lines or shapes within an image that guide the viewer's eye towards a specific focal point. They can be roads, bridges, pathways, or any other element that creates a visual path. Incorporating leading lines in your composition adds depth and draws attention to the main subject.
When composing your shot, look for natural or man-made lines that can lead the viewer's gaze. Experiment with different angles and perspectives to make the leading lines more prominent and impactful.
Symmetry and Reflections
Symmetry and reflections are powerful compositional techniques that can create visually striking images. Symmetrical compositions are achieved by placing the main subject or elements symmetrically on either side of the frame. This can be a building, a person, or any other subject with clear symmetry.
Reflections, on the other hand, offer a unique perspective by capturing a mirrored image. Water surfaces, glass windows, or polished surfaces can create stunning reflections that add a sense of mystery and intrigue to your photos.
Experiment with different composition techniques, such as the rule of thirds, leading lines
Experiment with different composition techniques, such as the rule of thirds, leading lines, symmetry, and reflections, to add visual interest and create captivating photographs. Remember that these guidelines are not strict rules but rather tools to help you explore different creative possibilities.
Foreground and Background Elements
Incorporating foreground and background elements in your composition adds depth and dimension to your photos. By including objects or elements in the foreground, you can create a sense of scale and provide context to the main subject.
Consider using elements such as trees, rocks, or other objects to frame the main subject, leading the viewer's eye towards it. Additionally, paying attention to the background can help you avoid distractions or unwanted elements that may detract from the overall composition.
Negative Space
Negative space refers to the empty or blank areas in your photograph. It can help emphasize the main subject and create a sense of minimalism and tranquility. By incorporating negative space, you allow the subject to breathe and stand out.
Experiment with different compositions where the subject is placed in a relatively empty area of the frame, surrounded by negative space. This technique can be particularly effective when photographing subjects with strong shapes or interesting textures.
Exploring Third-Party Camera Apps for Enhanced Control
While the native Camera app on the iPhone offers a wide range of features and settings, exploring third-party camera apps can provide even greater control over your photography and open up new creative possibilities.
Benefits of Third-Party Camera Apps
Third-party camera apps often offer advanced features and settings not available in the native Camera app. These can include manual controls for exposure, focus, ISO, shutter speed, and white balance, allowing you to fine-tune your photos to your liking.
Additionally, third-party apps may provide specialized shooting modes, creative filters, and editing tools, enabling you to achieve specific effects or styles in your photography. Some apps also offer RAW capture capabilities, allowing you to retain all the details and flexibility during post-processing.
Popular Third-Party Camera Apps
There are numerous third-party camera apps available on the App Store, each with its own set of features and capabilities. Here are a few popular options worth exploring:
ProCam X: ProCam X offers advanced manual controls, RAW capture, and various shooting modes, including burst mode, time-lapse, and slow motion. It also provides a range of editing tools and filters for post-processing.
Halide: Halide is known for its intuitive interface and powerful manual controls. It offers RAW capture, depth mode for portrait photography, and a variety of customization options to tailor the app to your preferences.
Camera+ 2: Camera+ 2 provides manual controls, RAW capture, and a wide range of shooting modes, including macro, slow shutter, and smile detection. It also offers a comprehensive set of editing tools and filters.
Adobe Lightroom: Adobe Lightroom is a comprehensive photography app that combines camera controls, RAW capture, and a powerful editing suite. It provides advanced editing tools, presets, and the ability to sync your photos across devices.
These are just a few examples, and there are many other third-party camera apps available. Take the time to explore different apps, read reviews, and experiment with their features to find the one that best suits your needs and preferences.
Conclusion
In conclusion, mastering the camera settings on your iPhone is essential for capturing stunning photographs. Understanding exposure and focus, utilizing HDR mode, harnessing portrait mode, and exploring features like Night mode, Burst mode, Live Photos, ProRAW, and Panorama mode opens up a world of creative possibilities.
Additionally, incorporating composition techniques such as the rule of thirds, leading lines, symmetry, and reflections helps you create visually pleasing and well-balanced images. And for those seeking even greater control and advanced features, exploring third-party camera apps can enhance your photography experience.
Remember, the key to mastering iPhone camera settings is practice and experimentation. Take the time to explore and understand each setting and technique, and don't be afraid to push the boundaries of your creativity. With dedication and a keen eye, you can capture breathtaking moments and create images that rival those taken with professional cameras.
So, grab your iPhone, unleash the power of its camera settings, and embark on a journey of discovery and creativity in the world of mobile photography.
Posting Komentar untuk "iPhone camera settings for photography"